Car Maintenance Guide
Batteries
BATTERY MAINTENANCE
Today's vehicles have more electrical demands then ever, and batteries play an essential role in meeting those demands. The battery supplies the electrical current that the starter motor requires to start the engine. It also provides power to the electrical components and accessories when the vehicle's engine is not running. When the electrical load exceeds the charging system's capacity, the battery steps in to supply the extra current required. The battery also acts as a voltage stabilizer for the entire electrical system.
Do-it-yourself maintenance can play an essential role in maximizing the life of your battery. It is also important to have your battery and charging system checked at least once a year. Early detection of a weak component can save you time and money. Look for a AAA Approved Auto Repair facility near you that has the proper testing equipment to perform a complete check of your vehicle's battery, as well as your vehicle's charging and electrical systems.
Battery Safety
- Although batteries may appear to be uncomplicated, they can be one of the most dangerous components to service if care and caution is not used. Follow the precautions listed on the battery and in your owner's manual. Also, the following precautions will help to avoid injuries.
- Wear eye protection and gloves when servicing or working around the battery.
- Avoid dropping the battery. Batteries can be heavy and can cause injuries if dropped.
- Avoid tipping the battery because sulfuric acid may spill out and cause burns.
- Never smoke when servicing your battery, or subject the battery to a spark or open flame. Explosive hydrogen gas is present and can ignite.
- Remove all jewelry before servicing the battery. A watch or ring touching a battery post may cause an explosive spark or burn.
- Be sure to wash your hands with soap and water after handling a battery. This will help neutralize any acid you may have come into contact with.
- Never place tools on top of the battery. Tools can cause a short across battery posts or cables.
Battery Inspection and Service
Whether you have a vent-cap battery, in which the caps can be removed to add fluid when it gets low, or a "maintenance-free" battery that is sealed, some regular maintenance is needed to ensure your battery works safely and effectively. Many batteries are labeled as maintenance free, but are actually serviceable. You should check the electrolyte level and add fluid, if needed.
Keeping Your Battery Case Clean
The simplest maintenance procedure you can perform is keeping the battery case clean. Dirt and residue can actually cause a current drain on the battery. Clean the battery case by wiping it with moist paper towels and mild detergent.
Checking the Electrolyte Level
If the battery has removable vent caps, on a monthly basis, remove the caps and check the level of the electrolyte, which is a solution of sulfuric acid and water found inside your battery. The level of the electrolyte should rise above the top plates of the battery. If fluid is needed, add water, but be sure to avoid overfilling the cells. Distilled water can be purchased at most grocery stores and is recommended to be used instead of tap water, which may contain mineral deposits that can adversely effect battery life.
Positive and Negative Terminals
There are typically two ways to distinguish positive from negative: (a) color-codes: red for positive and black for negative; and (b) symbols: + for positive, - for negative. On post-type terminals, the positive post is the larger of the two. Don't pry the cable clamp off the battery post because this may harm the battery case or cause internal damage. Check the batteries posts and terminals for loose connections and cracks.
Attaching Battery Cables
Always install the positive cable first, followed by the negative cable.
Removing Battery Cables
Always remove the cable from the negative battery terminal first, followed by the positive.
Removing Corrosion
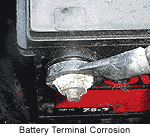 Inspect the battery case for cracks and bulging, as these are signs of a failing battery. You also need to look for corrosion around the battery terminal connections and battery hold-down. Corrosion can be cleaned off with a small, stiff brush and a solution of baking soda and water. After removing the corrosion, rinse the battery with water. (Capture the used water in suitable container, such as a plastic drain pan, and dispose of it properly.) Inspect the battery case for cracks and bulging, as these are signs of a failing battery. You also need to look for corrosion around the battery terminal connections and battery hold-down. Corrosion can be cleaned off with a small, stiff brush and a solution of baking soda and water. After removing the corrosion, rinse the battery with water. (Capture the used water in suitable container, such as a plastic drain pan, and dispose of it properly.)

JUMP STARTING
Jump Starting Precautions
- Before you begin, be sure to set the parking brake, then turn off all electrical accessories and the ignitions of both vehicles.
- Unplug all electrical components - such as cellular phones and radar detectors - before disconnecting or connecting the battery cables. Jump-starting may damage such items.
- Do not allow the vehicles to touch each other.
- Connect cables in the correct order and position. (See Removing battery cables and Attaching battery cables below.)
- Never attempt to charge or jump-start a frozen battery or one that is low on electrolyte - it may rupture or explode.
Jump Starting Your Vehicle
With the extensive use of electrical equipment on today's cars, it doesn't take much to drain a battery. While jump-starting a battery may appear simple, special attention must be taken to ensure the safety of persons and vehicles involved.
- Install one end of the positive jumper cable clamp to the positive terminal of the discharged vehicle's battery. The positive jumper cable clamp is typically color-coded red.
- Install the other end of the positive jumper cable to the battery's positive terminal of the vehicle doing the boosting.
- Install the negative jumper cable clamp to the negative terminal of the booster vehicle's battery. The negative jumper cable clamp is typically color-coded black.
- Connect the other end of the negative jumper cable to a grounding point on the discharged vehicle, such as the engine block or an air-conditioning bracket. Try to keep the jumper cable as far from the battery as possible.
Try to start the vehicle with the discharged battery. If engine seems to be turning too slowly, stop cranking and start the other vehicle to avoid draining both batteries. Try to start the discharged vehicle again.
After the vehicle starts, remove the cables in the reverse order of installation. Always refer to the vehicle's owner's manual for specific precautions regarding jump-starting.
The numbers indicate the sequence of attaching jumper cable clamps. Remove the cables in reverse order (4, 3, 2, 1).
CHOOSING A BATTERY
Causes of Battery Failure
- Heat: Heat is a major factor in battery failure. Ensure that the battery heat shield is installed if your vehicle came equipped with one. (A battery heat shield is a cover that fits over the battery, and is usually made of plastic.) Purchasing a high quality battery can substantially lengthen battery life over one that is constructed of lesser materials.
- Vibration: Vibration causes the breakdown of the internal parts of the battery. Assuring that your battery fits properly and that the battery hold-down is installed correctly and holds the battery firmly in place will minimize the effects that vibration has on your battery.
- Malfunction of the charging system: A malfunctioning charging system, either overcharging or undercharging, can dramatically shorten battery life. Have the charging system checked yearly to assure it is operating at peak performance.
- Corroded Cables: Keep cables clean. (See Battery Maintenance for more information.)
- Low Electrolyte: Maintain the proper fluid level in your battery. (See Battery Maintenance for more information.)
Purchasing a New Battery
Eventually, every car will need a new battery. The "one-size-fits-all" batteries found at large retail stores may be more of an expense and headache than they are worth. Battery ratings, physical size, and post location are important factors in ensuring the proper fit and function of your battery. In fact, choosing the wrong battery can adversely effect the entire electrical system of your vehicle.
Quick Tips
- Select a battery of the same physical size as the original equipment battery. This will ensure proper fit of the battery hold down and avoid any clearance issues.
- If your vehicle is equipped with a protective cover over the battery, be sure it will fit the replacement battery. (This cover is usually made of plastic.)
- Never install a battery with a rating lower than what the manufacturer recommends. A higher rated battery will work effectively if it fits properly, but a lower-rated battery will have an adverse affect on the vehicle's electrical system.
- Purchase from a large volume seller. Getting a fresh battery is important. Most batteries have a life span of three to five years. Don't buy a battery that has been on the shelf for months. The life span includes the time the battery sits on the shelf.
Date Codes the Key to Getting a Fresh Battery
Most battery manufacturers record the date the battery was manufactured or shipped from the factory (the date code location on the battery can vary by manufacturer).
Date codes can be found either stamped in the top edge of the battery case or on a sticker affixed to the battery. Letters commonly identify the month: A for January, B for February and so forth. (Some shipping codes do not use the letter "I," as it may be confused with the number "1." In these cases, J would reflect September, K for October, L for November, and M for December. The number (following the letter) identifies the year. Therefore, the date code "B9" signifies a battery freshness date as February 1999. This code sequence is used by GNB, Interstate, and other popular battery brands.
|